Showing posts with label My Crafts. Show all posts

Tuesday, August 18, 2015

His Rib Family Tree

After the birth of both Ribletts, His Rib has suffered through multiple miscarriages. She told me awhile back that she wanted something that showed her whole family. I came up with this idea & started making it for her birthday gift (2 birthday's ago), & it is finally finished! Each precious baby has a leaf on the family tree, including the Ribletts Conner & Elias. After them, there is Hope, Jonah, Shiloh, Grace, & Lev.
I went with His Rib to the doctor shortly after finding out she was pregnant with Lev, & we were able to see his heartbeat. This was the first baby since Elias who we got to experience their heartbeat! It was such a special moment & a confirmation that this was a baby! They are all Rib & His Rib's babies! Sadly Lev did not make it through the next day, but he left us with a video of his heartbeat to remember him by.
All of these children are loved & special to us! I am so honored I was able to make this family tree as a reminder of each of their lives! And as you can see there are plenty of leaves for their family as it grows.

If you would like to make your own family tree, I used the tree outline at the bottom of this blog, or you can find whatever tree outline you like best. Then I used a heart stencil for the leaves, & I used my pinking shears to give the name at the bottom a fun edge :) I printed out all the names and traced them on the leaves, then I adhered all the parts to the main fabric using HeatnBond. I embroidered around all the edges to make sure they stayed in place & to add a fun color contrast. This was not a fast project for me, but it was a very meaningful project. I am so glad they loved it!

Tuesday, August 6, 2013

Photo Challenge Catch Up

Ok, I'm behind again on my Photo Challenge. The most frustrating part is that I took the pic 2 weeks ago & just completely forgot to post it : /

So 2 weeks ago the theme was Yellow.
My friend Phil has spent the summer cleaning all the brush out of his back yard. In the process he found this sign buried under the overgrowth. I thought it was a perfect Yellow shot :)

Last weeks theme was I Made It! 
I chose my handmade fabric flower headband to photograph. I love this headband! It's so soft & feminine :) You can see more pics of it & become the proud new owner of it in my Shop.

This weeks theme is It's A Proverb
Proverbs 16:31 (ESV) Gray hair is a crown of glory; it is gained in a righteous life.
This is my Papa, he used to be a preacher. He is the strongest prayer warrior I've ever known. He has a gameshow host hair do ;)
We had to take him to the ER last night, he has heart problems. I would appreciate all prayers sent up for this prayer warrior!

Thursday, May 30, 2013

This Crazy Life

This weeks Photo Challenge theme is Fun in the Sun. As soon as I read the theme I thought of my Mixed Media Canvas.
The button sun is my favorite part of this canvas!
I also painted the sides to give it a finished touch.
Hello little dragonfly!

I have posted This Crazy Life Mixed Media Canvas in my shop if you would like to take a look.
Let me know what you think! :)

Thursday, May 9, 2013

Scrapbooking Girls Night!

Sunday night I got together with my sisters & my adopted mom to scrapbook! It had been way to long since any of us had scrapped!


I clearly did not know this pic was being taken lol, but that's my sticker collection... yes I'm kind of a scrapbook supply hoarder ;)

We were working on scrapbooks for a Disney Trip, an Ireland trip, dating (even though we are all now married... sometimes we get behind in our scrapping), and handmade paper flowers for scrapping. We were just having a great time!

 Sorry about the graininess of this pic, my IPhone decided not to be friendly with me : / But look at that cute mama! This weeks theme for my Photo Challenge is Motherly Love. This was my choice for this week's pic. She's a great mommy! :)
 And a cute pregnant lady :)

 We are very excited aunts!


 We are also very silly aunts ;)
Very soon we will be teaching Niecephew all about crafting! 

Thursday, January 31, 2013

Lacy Hair Flower

This week's theme for the photo challenge is Delicate. I walked into my craft room for inspiration & immediately decided on my Handmade Lacy Hair Flower. I love the delicate lace with the contrasting wooden button.


This is my most popular hair flower, each petal handcut making every flower unique. You can see more pics of this hair flower as well as my other creations in my shop.
Let me know what you think!

Sunday, February 5, 2012

Baby Blue Striped Hair Flower

This weeks theme for the Photo Challenge was Blue. So I took this photo
This is one of my handmade hair flowers. This one was made from a shirt Tiffany (Crazy Lady Downstairs ;) gave me because it was old & she didn't wear it anymore. So I took it from it's old unused purpose, and gave it a new life as a hair flower :) You can see more about it in my shop.
Next weeks theme is Crowd, so I'll let you know what I come up with.

I don't know about you, but I am enjoying some great commercials right now :) Have a great Super Commercial Sunday! ;)

Monday, January 9, 2012

Sewing

For Hubby's & my anniversary back in June I bought him an industrial sewing machine, yes that's what he wanted. I had no intentions of using this machine, I prefer to handstich :) But then while at the craft store I found a "Sew a Friend" kit on clearance. It included the pattern, instructions, & fabric to make a monster. Against my better judgement (the little angel on my shoulder whispering you have never used a sewing machine before), I bought it & decided to make it for Elias, the youngest of the Crazy People who live downstairs, for Christmas. Hubby taught me to use the machine, and after lots of threats to throw it out the window I finished the monster. I also learned to never use cheap thread in a sewing machine, apparently that was why I was having so many problems.
Here is the finished monster :) I guess sewing machines aren't as scary as I always believed.
 Elias loves his monster :) And Conner wants one now also. Which I owe him since he is older and I have never made him anything. He is so mistreated ;)

So since I have conquered my fear of the sewing machine, and learned not to use cheap thread in it, I decided to finally do something with all those special, but to worn out to wear tshirts that hubby & I have held onto over the years. I made a tshirt quilt! It is a rag quilt, and the back of it is the backs of the tshirts, which made it fairly simple.
First I chose 25 shirts to use, and I cut a 16" square out of the middle of each of them. I did this by pinning the front & back together so I could cut a square from both the front & back at the same time. Then I decided what order the shirts would be in on the quilt, & started pinning them together 2 shirts at a time.  Then I sewed the squares together with the right sides facing out so there is an exposed seam. This gave me 5 rows of shirts, each row being 5 shirts long (sorry I didn't start taking pics until late in the process).
After I had the 5 rows, I pinned the first 2 rows together, again with the right sides out to give an exposed seam, & sewed it together.

The first 2 rows

I continued this until all 5 rows were sewn together
All 5 rows, sorry not a great pic :(

Then I sewed along the 4 outer edges of the quilt. All seams are as close to 1/2" as I could muster as a newbie seamstress :) None of my seams are straight, so I ask that good seamstresses not look to close, please :)
Lastly I cut the seams in 1" pieces to give the "rag" look & washed it.
This is a close up of the "rag" effect
And here is hubby with the finished quilt :)
So if there is anything this newbie can tell you it would be, don't use cheap thread. The machine stopped giving me problems once I changed the thread!
If there are any experienced seamstresses, I could use any tips you would like to share :)

Wednesday, October 19, 2011

The Hidden Tree

Before my first craft show I started making a piece of wall art from upcycled materials. I took pictures of the entire process so I could show you. Then I got busy getting ready for the craft show, so the wall art was put on the back burner. I am now 100% finished with it & want to show you how I created it :)
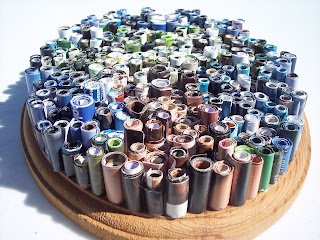
I started with old magazines & cut each page into strips of varying widths.
then I folded each strip in half & sometimes in half again depending on how wide it was. After a very long time of folding & sorting colors I began rolling the strips. I used a broken piece of antenna to roll the strips on, but any skinny long object would work.

After rolling I glued the flap to the edge of the rolled strip & glued the rolled strip to this wooden plaque that I rescued from the trash.

After gluing the first piece & realized that I needed an outline of the tree I was planning on creating. I drew the tree & continued gluing strips.

The tree trunk is taking shape.
Now the tree trunk is finished & I will start the leaves

Look, it's a tree!

After finishing the tree I surrounded it with blue for the sky.
 Then I sprayed the whole piece with a clear coat to protect it, & here is the finished piece:
To see more pics of the finished piece, please visit my Etsy site.
So what have you been creating lately? Let me know in the comments!

Tuesday, September 13, 2011

Date Night Mini Album

Today I posted a new mini album on my Etsy site. I created this album to record the memories & pictures from your date night with your honey ;)


I made it with what looked to me like teen themed "Love" paper, because sometimes it's nice to act like high school sweethearts again!


Hubby & I don't have many date nights anymore, but maybe after making this album we will have to plan something extra special!
 What about you? What did you do on your last date with your sugar muffin? Are you a dinner & movie person, or something more elaborate? Let us know in the comments & maybe everyone can get new date ideas from everyone else!

Thursday, August 4, 2011

Halloween already?

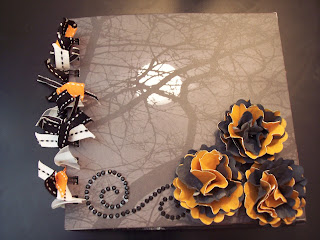
Well yesterday I decided to create a Halloween mini album to put on Etsy. My reasoning for this is that usually by the time I decide to make a holiday themed item its to late to post it in time for someone to get it before the holiday is over. So this one I did in plenty of time :) I finished the Halloween album today & thought it was so cute that I wanted to share it with you.
This is the cover, I made those flowers :)
Pages 1 & 2 Boo with a black cat & a witch flying in the moon light
Pages 3 & 4 Trick or Treat with a frame for a picture of someone Trick or Treating, Toil & Trouble with a raven
Pages 5 & 6 Beware of Bumps in the Night, & spooktacular
Pages 7 & 8 A witch brewing something spooky, ghosts, PARTY, boo, spooky, Oct 31 (Put it in your calendar, that's Halloween)
Pages 9 & 10 Trick or Treat Beware of the Dark, Its Halloween
Back cover lots of stars :)

I bound the album with my Bind It All, which I love! One of my favorite purchases for my scrapbook station!

So what have you been working on? Do you think it is to early for a Halloween album? Let me know what you think.

Tuesday, July 26, 2011

#3

I have completed another thing on my summer list of craft projects :) You can see the first 2 completed crafts here, and my 3rd completed project is a Rock & Roll Baby Girl Mini Album :)
I love love love how it turned out! I finally opened up & used my Bind It All that I bought months ago & truly love the completed look that it gives :) You can see more pics in my shop, let me know what you think!
Also today I created a coupon code to celebrate the end of summer, and hopefully take our minds off this heat if only for a moment ;) Use code ENDOFSUMMER at checkout for 15% off your purchase.

Well I just have 2 more projects on my list to get done before summer is over, wish me luck!

Thursday, July 21, 2011

Using up Supplies

I read this post the other day about investing in scrapbooking, and it really got me thinking about being creative with the supplies I already have. I try my hardest to find creative ways to use things I have instead of running to the store, such as I use clothes that are stained or don't fit to make my fabric flowers so I don't have to buy fabric. I have discussed before about Thrifty Scrapbooking, so I save my toilet paper tubes, boxes, & the like. And I have started saving old books that are falling apart to cut flowers out of & to use to Mod Podge (does anyone else pronounce it Modge Podge?). But I know there is more I could be doing to keep myself working from my stash instead of searching through the store for the latest & greatest. It would also help with my scrapbook storage (unstorage?) problem if I used up what I have instead of buying & storing more. Stephanie's post has really got me thinking and committing to finding new ways to use what I have. I'll let you know what other ideas I come up with, & please if you have any ideas to share with us leave them in the comments & they will be much appreciated!

Friday, June 24, 2011

So Far...

A couple of weeks ago I made a short list of crafts to work on this Summer, & reading back over the list I realized that I have already finished 2 of them! Granted they were probably two of the easier ones on my list, but still I'm excited :)
First I made a Flower Hair Clip

We decided to make hair flower clips to wear to the scrapbooking convention so we would be cute :) And I also made this one so I could post it on Etsy. We took a picture together looking cute with our hair flowers, & when I get that picture I'll show you.

The second thing I can cross off my crafting list is Flower shirt, purse, & hat pins

I love the way that looks on my hat :) I may have trouble parting with it lol

Thats what I've done off my summer to do list, how about you? And "summer resolutions" underway? Tell us about them.